Sunday, January 29, 2012

the birthday party

My little man is all grown up!
We had to sing him happy birthday three times because when the lights would go up he'd scream "again, again"!  And how do you say no to a little boy on his birthday?  We've totally been practicing our blowing out skills too!  
Photobucket

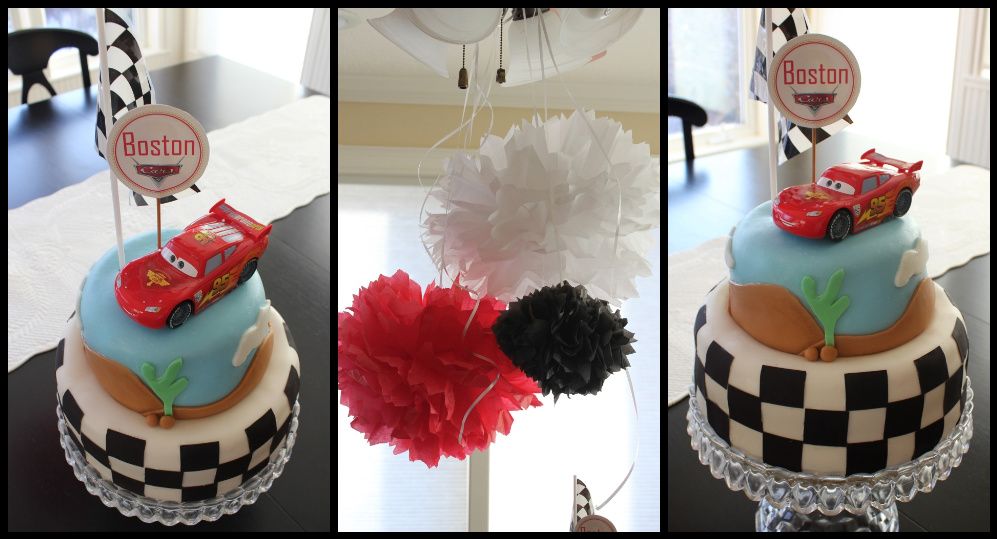
Are you impressed?  I made that cake.  Thank you hobby lobby cake decorating class!  Don't worry, it only took me like, ten hours.  Funny story actually.  This party was supposed to be two weeks ago.  I made all the cakes and that weekend we all got sick.  Party postponed.  Cakes in the freezer.  The next week, oh I had a baby.  Yeah.  The cakes had come out of the freezer to thaw and so back in they went!  I was worried this party wouldn't ever happen!  The decorations had been up for weeks!
Photobucket
Photobucket

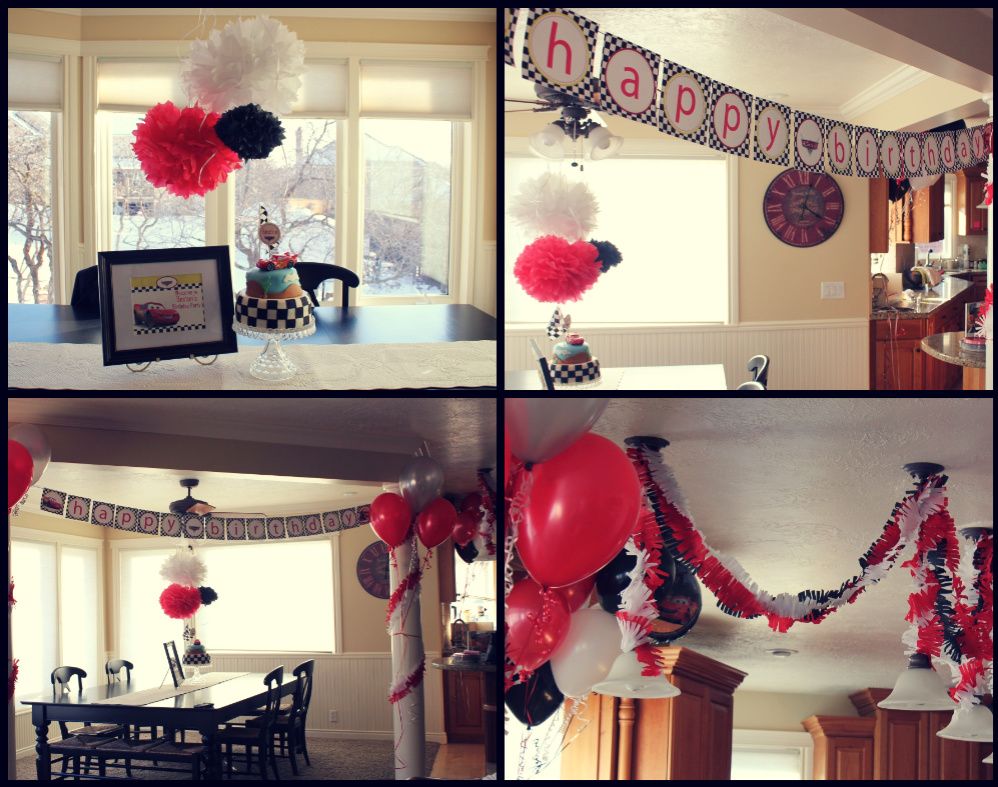
Cute huh?!  Had to use the fringey streamers!  The banner, welcome to boston's birthday sign and cake topper came from the party pack over at Whistle While You Work.  Remember she did that super fun giveaway a few weeks back?  There were so many other things in the pack, I just never got around to using them.  SO CUTE though!

At the end of the night Boston went home with his grandma and uncles to Delta.  It was actually really sad!  I feel like I've been neglecting him the last few weeks.  With not seeing him while I was at the hospital to coming home and not being able to play with him.  He ALWAYS asks me for to put him down for bed.  Always... he likes to play with my hair :-)  He doesn't even ask though anymore.  He just says "night night mommy".  Makes me want to cry!  Hopefully things will get easier.  They HAVE to get easier!  Little Savy has colic so I'm going off dairy.  It's going to be so hard because two staples in my diet right now are ice cream and chocolate!

Thanks for being a part of my life you guys.  I love all your sweet comments and encouraging advice. I'm sorry I don't get the chance to write all of you back!

LOVE YOU!

Photobucket


Friday, January 27, 2012

Priceless

Little peanut hasn't been sleeping well.  She's fussy from about 12-4 am.  So this morning when she wouldn't eat because she was sooo tired from being sooo naughty the night before I had to capitalize on her exhaustion.  Out of the million pictures I took, one picture turned out.  Does that matter though when that one picture looks like this?


Does it not make you happy?!

Photobucket

Wednesday, January 25, 2012

Savannah Jane Smith


Do you not love her?  I started contracting Thursday night.  By 6 the next morning we were at the hospital.  While I was changing into that fashionable gown my water broke.  Perfect timing I guess?!  A few hours later she was showing off her healthy lungs.

She was perfect


We were having issues figuring out her name.  I wasn't feeling Blake anymore... too many one syllable words... not beautiful enough.  We went through Chloe, Rylie, Shelby and landed on Savannah Jane Smith.  We've been calling her Blake for so long that we're having a hard time making it stick.  Boston keeps calling her Blake!  So who knows, we might be changing it back to Blake again in a few more weeks!

I am doing great and Boston is such a sweet older brother.  We love having a newborn in the home.  Those little sounds and painfully adorable stretches.  I am in love with her and so far have loved waking up in the middle of the night to cuddle her.  I cannot get enough of her- she is perfect.

My good friend Chelsey, from Chelsey Art Photography came to the hospital and took these amazing photos.  She was just a few days old.  If you live in Utah and have a baby on the way, a wedding in the works or in need of a family photo shoot, you should check out Chelsey's Photography.  She is absolutely amazing.

Photobucket

Monday, January 23, 2012

How to depot MAC makeup

Alright ladies.  I don't know how many of you use MAC makeup.  And for those that do, I don't know how many know there are these awesome customizable palettes you can buy.  This is a recent discovery for me.  I figured there have got to be a few of you who will find this tutorial useful!

I have a good chunk of MAC eyeshadows


Every morning I rummage around my makeup bag looking for the colors I need.  Such a waste of time.  Let me introduce you to the pro palette- your new best friend


You can buy palette refills that come ready to insert in the palette, they are $11.50, as opposed to $15 for a regular eyeshadow


Awesome right?!  Well what are you supposed to do with all your eyeshadows that are still in the eyeshadow pot?

You depot them!  

Here's how you depot your MAC eyeshadows to fit into the pro palette

 STEP 1:
If you open up your eyeshadow, you will see a tiny mark in the front where your eye shadow can come out of the container.  Insert your knife there and slowly turn to release the cartridge (for lack of better word)
 This is what you should get

STEP 2:
Turn on your flat iron, get a square of tin foil out and place your cartridge on top.  Your objective here is to melt the glue that's keeping that little metal pan stuck inside the cartridge.  I left it on a good 30 seconds.  If it doesn't easily pop out with a pin (next step) heat it up again

STEP 3:
See that little divot in the middle?  Poke a pin through it and the tin should release
 

STEP 4:
Get some goo gone, or rubbing alcohol and rub off the glue from the metal pan

STEP 5:
Take a slim magnet (you can buy at any craft store) and adhere double sided tape to one side
I used my scrapbooking tape
Tape it onto the back of your clean pan

YAAAAY!!!  
Now you have all your eyeshadows in one convenient location!

QUESTIONS:
1. Why do you need to put a magnet on the back of your pan?
The palette's are magnetized- that's how they hold the metal pans in place.  This method also makes them refillable!

2. I need to be able to remember the color of my eyeshadow, any suggestions?
You can easily rip the label off the back of your eye shadow and stick it on top of the magnet.  I was going to do this but my labels were so dirty and worn you couldn't even see what the shade was anymore!

3. I can't get the metal pan to pop out... what should I do?
You need more heat.  The plastic should be hot enough that it melts the glue that's holding the metal pan in place.  I actually melted the plastic a tiny bit on my first one and it was just fine.  It's got to be hot enough or the pan won't come out. 

4.  If I add my eyeshadow label to the back, do I need to clean off the glue?
No.  Leave the glue on your metal pan, adhere your magnet and let the glue on the metal pan help hold your label onto the back!

Good luck ladies.  Let me know if you have any questions!  Hopefully this tutorial was useful to some!


Photobucket

Friday, January 20, 2012

African American Hairstyles

  If you are looking for an African American hairstyle there are many african american celebrities than you can inspire form their cool hairstyles.African American haircuts here range from short to long haircuts,making you look trendy and stylish.African American hairstyle is an individual choice and should go with your personality, occasion and face.It would be better approach that you first try

Fringey Streamers

So my little sister planned my baby shower.  As you guys saw a few days ago.  Wasn't it was the cutest thing?  The morning of she brought me some crepe paper sheets to cut up.  I was like, what the heck are these crepe paper sheets?  Ha, who buys crepe paper sheets?  She then directed me to Pinterest.  Of course!

Oh Happy Day invented these awesome fringey streamers
Photo Source
What you need:

Crepe paper sheets and some scissors.  Easy enough.  You could buy these crepe paper sheets at Zurchers if you don't have time to order them online.  They don't carry them at Walmart, Hobby Lobby or Ben Franklins.  Ha, I checked!


Step 1: Cut a 2-3 inch chunk off the end of your crepe paper sheet.  I found it doesn't need to be perfect.

Step 2: Now cut thin strips.  They should be evenly spaced.  My scissors were crappy so it wasn't working out too well... in the end it doesn't really matter

Step 3: Flip it over and repeat step 2

Step 4: Open up the streamer


Step 5: Scrunch it in your hands to loosen up the pieces

Viola!  Cutest home made streamer ever!!


Photo Source
Now go on, make your own super cute party decor.  These took like five seconds!

Photobucket